Growing rice part 1: Search for rice varieties, weave a sieve
In a series of projects to improve my early life, I have a video on how to grow rice in a “primitive skill” style. Rice (genus Oryza) was a wild plant on the “supercontinent, Gondwana” at least 130 million years ago and spread throughout the continent during continental drift. There are about 21 species of wild plants in this genus. In this article, I want to introduce you to a type of rice called “Oryza sativa”.
Rice provides carbohydrates as a major ingredient to create energy for human activities. The tools I use here are: stone axes, baskets, stone knives, … to serve during the processing and planting of rice.
“Primitive skill” begins by bringing baskets and axes into the forest to find seeds. This type of rice is often found anywhere, in damp places, even on hillsides or mountains. This type of rice is usually 1-2m high with grass and usually grows in about 4 months to be harvested. I have to wade through caves, ravines, dangerous waterfalls, drag through swamps or through endless prairies to earn a handful of rice grains. After finding them, using the ax to cut, to avoid falling rice, I chose to cut half of the rice plant and bundle them in a basket to bring them home. On the way home, I will find more bamboo pipes to make containers, I will introduce below. After returning home, taking advantage of the heavy sunlight, I left them dry on palm leaves in the yard. The purpose of drying rice is to easily separate the grain from the straw.
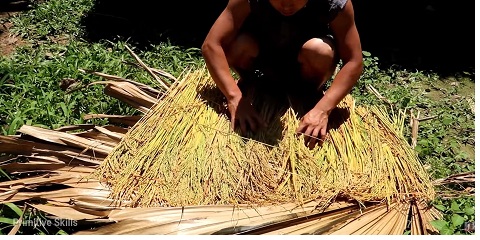
(seed drying)
While waiting for the paddy to dry, “primitive skills” began to be used as containers, as well as handling seeds. What applies the “primtive skills” chosen here is the bamboo “sieve”. It will be woven with bamboo strips and clamped with bamboo splint to create suitable deviation, hardness and durability during use. Stone knife is the tool used for separating and separating.
The process of creating a “sieve” follows “primitive skills” as follows:
– First, use a stone knife to cut the bamboo tubes about 80cm long, split each bamboo tube into pairs, then separate them into small spokes with the little finger by placing a piece of bamboo on the adjacent wool knife and using Wooden hammer to beat it from the top down. After creating the split line and then manually separating each spokes, do the same with the remaining bamboo. When splitting into spokes, the angled edges of the spokes will be very sharp, especially the blue outer layer. Because the process of kneading and rubbing a lot would be very easy to cut, I used the knife to sharpen them before going to the next step. The next step is to use a knife to separate the thin spokes into strips, using only the green outer layer and removing the inner white layer.
– The second step is how to knit: this part is very important, but not too hard just by looking at “primitive skills” and you can do it yourself. Select enough bamboo strips to form the knitting pairs, here I choose 6 pairs equivalent to 12 slices arranged in parallel and vertically compared to the view. Knitting each horizontal strip as follows: The step of the cross-section is through two vertical strips, if hung on the first two vertical strips, must pass through the bottom of the next two vertical strips to go through the vertical strips. The second horizontal strip will have a different path from the first attack. If the first horizontal strip is hung on the first two longitudinal beams, the second horizontal strip will only be protected through the first vertical strip and will pass through the second and third vertical line, and through the longitudinal lanes behind each pair, cross on the first pair will pass below the pair. The third horizontal strip will pass under the first 2 vertical strips, passing through the vertical strips after each pair of the first 2 horizontal strips. If the bamboo strip is too tight, you cannot squeeze them with your hand, then use a bamboo stick and smash them together with a wooden hammer. Knit to all sides of the strip and see that it is wide enough to stop knitting. At this point we will get a “sieve” and will move on to the final step to complete a “sieve”.
– The final step is shaping, perfecting the contour and shaping: Prepare a soft thread, a lump of charcoal, a short bamboo stick. Use one hand to secure one end of the piece in combination with a small bamboo stick to create the reel in the center of the “sieve” plate, the other end of the piece is clamped with a carbon lump so that when it rotates, draw a circle on the “sieve” plate. Based on the circle, I used a stone to carve out the excess bamboo strips around to form a circular “sieve”. After cutting, we prepare two bamboo rods long enough to bend to form a bamboo circle, combined together into a 2-layer bamboo edge to clamp the “sieve” edge to create a “sieve” border. Prepare 3 more pieces of wood about 15cm long, cut in half and held with a piece to make a pin when pressing the “Screen” border, with 3 thin wooden sticks at one end. Pressing as follows: the large ring placed below after pressing will be outside, the small ring placed after pressing will be inside the “sieve” edge. Press the mold first with your hand, then clamp the two rings together with the wooden “clamp” prepared above, so that the handle can retain the “original skill” need to insert a thin wooden bar with thin ends between the two clamps. wood from top to bottom. The next clamp is made similar. When moving we clamp into the next position, we must fasten with strands so that the edge “screen” is not distorted. A small note when clamping the edge is: if the edges do not bend up, we will sparingly separate the bamboo strips to reduce stiffness and then continue to use the bamboo tongs for clamping. Always be sure of every step, because the previous step will be the basis for the next. After many times of clamping and fastening with flat strands, to ensure and use longer, I proceeded to wrap 2 additional strips of bamboo. One strip covers the top of the border for protection, the other is used as a coil. Roll each segment 2 rounds, 2cm apart from each other, strips of bamboo want to go through the “sieve”, “sieve” should be stabbed with the sharp bamboo sticks as in “video“. Protect and perfect the “sieve”.
After a “screening” session, the rice is now dry. The “primitive skills” brought “sieves” to the drying place, gathered bundles of rice drying on palm leaves into “sieves”, cleaned each grain from the palm leaves and put into “sieves”. Use your hands to knead and rub vigorously to remove rice from the straw. Use vinegar feet and knead to separate the remaining rice grains from the straws, until the straw is empty. Because to find a rice seed, it’s really not easy at all.
Some of you may be wondering “why are primitive skills not using wood or something to break, split quickly, or hold the root of the remaining straws into something to separate?” but just use your hands and feet to do that. I know that your question is not wrong, or even better, but that will only be true when rice is separated for cooking purposes. Here, the paddy that I split is used for breeding purposes, so it cannot be scratched or cracked. When scratching or cracking the grain, the grain heads, simply where the growth is no longer, how can grow again?
After separating the paddy from the straw on the “sieve”, now the “original skill” must remove the remaining straw debris on the “sieve”. Rice grains, not filled, not stretched, straw dust … are removed by performing manual sieving. This is considered the stage where “screening” shows the most effective, its name already says it already. The way the sieve works is as follows: The seed is placed inside the sieve, using both hands to lift the sieve, slightly bent forward. When the hands raise the sieve, the paddy is thrown into the air to create a gap between the sieve and the paddy, and then quickly sifted into place at the time of preparation. At this time the sieve will be lowered faster than the paddy and create a breeze between the paddy and the sieve, after which the husks, seeds, dust, grit, etc. will be swept out of the sieve by the wind. We can use the mouth to blow more air during the sieve to shorten the cleaning time. However, it should be noted that the airflow should not be too strong to avoid paddy being flown out of the “Sieve”. After a long time, the paddy used as the seed was relatively cleaned.
Thank you for reading the article on “primitivekills.net“.
Read the next section here


Social