Primitive Technology: Toilet (WC)
In order to keep a clean, fragrant environment and to have a natural forest flavor, “primitive skills” created a WC to decompose garbage :))
In this article, “primitive skills” will show you how to do WC in the primitive era from the tools and materials that are naturally available in nature. Tools to be prepared include: stone ax, stone knife, wooden spade and bamboo shovel; Necessary materials such as wooden columns, bamboo, palm leaves, …
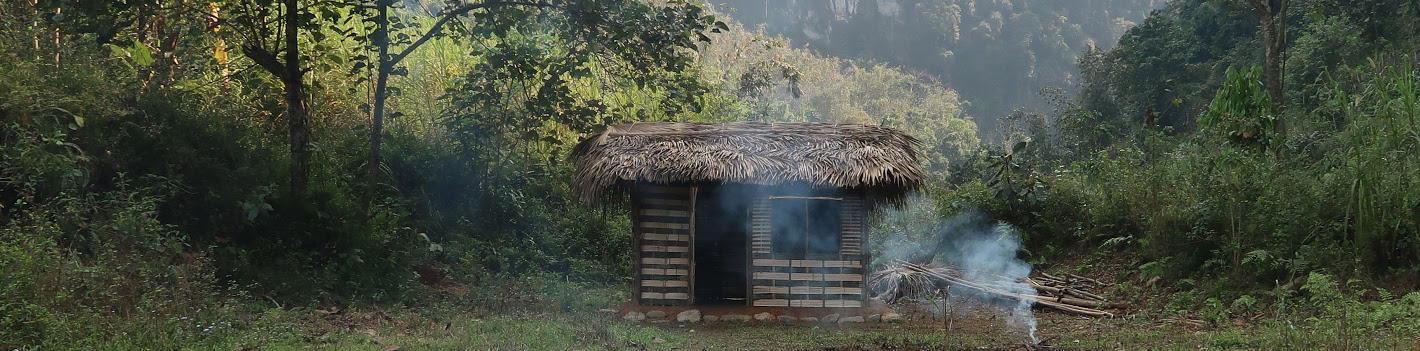
Waking up early in the morning, after cleaning the house, weeding and cleaning around the house, I brought tools like 2 wooden shovels, a chisel, a stone knife and 1 stone ax out of the faucet made in the previous article. Remove the ax blade from the handle and sharpen it on the grindstone, grinding it thoroughly, checking if it is sharp. If it is not sharpened until it is sharp enough, sharpen the ax, then switch to sharpening the stone knife and chiselling the stone. When everything is ready, I proceed to bring the prepared equipment to search and review, choose where to build WC. After careful scrutiny, I decided to build it at a location about 50 meters away from my house after a ledge and near a stream; This place is not too steep and dense, so it will be convenient for me to clean and dig a hole. I pulled the grass with my hands, combined with a stone knife to clean the grass around where I was going to build the WC, after finishing, used a wooden stick to sweep the grass around, picking up the entangled stones. Using a wooden shovel, digging the excavated areas, adjusting the flat surface with a bamboo stick. Next I will dig around the ground to form a drainage ditch, avoiding the water from entering the WC floor during periods of heavy rain or flood. Proceed to determine the size of the hole to be dug, utilizing the surrounding bamboo branches to measure. Get the size of the hole 60x60cm; Carefully measured horizontally, both vertically and diagonally must also be equal to determine a square pit. Using a bamboo sword to dig along the edge of the newly measured road and scooping the soil with my hand, I dug it in one session and the depth was 1m. At the bottom of the pit, I encountered a huge stone and I decided to stop and accept with that depth.
After I finished digging the pit, my next job was to find materials to narrow the crater and erect a hut to cover the pit from getting into the water. Find and choose the right tree, but keep the branches supporting them; larger pieces of wood are likely to cover the crater. Keep bringing and bringing them back. Choose two of the best, most reliable pieces of wood placed near the crater. Measure and determine the distance of the crater of about 15cm, place two selected wooden sticks up and conduct digging and burying the two ends of wood when passing through the pit. The purpose of placing the bars perpendicular to it will reach the ground surface around the pit. After digging and burying the ends of the wooden sticks, we took the surrounding soil and covered it and narrowed it down [5:40]. Next, place the horizontal bars (perpendicular to the two below bars) carefully, select the 2 middle bars and mark the location to cut to create the crater. Place the stick to cut across the groove and then use the stone ax to cut it properly. Do the same with the second one. After you have finished cutting, rearrange the horizontal bars so that the 4 sections of the wood are placed on the 2 vertical bars and make a square hole in the middle. Go down the stream to search for rocks to insert gaps between the slats and the sides. Uproot previously dug to cover the logs. Cover the crater with a stone, scoop the soil around it, and squeeze it with your feet. After covering the soil layer with sufficient thickness, use the foot to compress the soil. Finally, I used the rock that covered the crater and adjusted the crater to be neat.
The next morning, the “primitive skills” went down the stream and took three rock fragments in the shape of one piece, sanded and scoured in the stream and took them to the toilet. Two pieces work on the toilet and one cover covers when not in use.
The next step is to find a bamboo tree to guide sewage and build the roof. The way the “primitive skills” is used to select good bamboo is to choose plants that do not have their tops broken, not deep in the trunk, not too old or too young and more importantly step by step using stones to knock each tree. to see how it resonates A good tree will have a loud and clear resonance, a worse tree will have low bass and often the sound will not be loud. Picking a good tree, I started using a stone knife to cut it from around until it fell. Cut the branches and the top of the bamboo and measure and cut a part near the top, using a stone knife to cut into 2 pieces. Choose a piece and use a stone to carve the inner bamboo eye and use it as a urine trough. A urine trough is placed in front of the sitting direction and leads 3 m away. Conducting to sharpen the supporting poles and plug them in turn as in the “video” done, the two poles on the right of the screen are evenly spaced and lower than the left two piles about 20 cm to create a slope for drainage. faster when it rains without leaking into the toilet. Measure and cut 2 bamboo sections near the tops to make horizontal bars placed next to the supports of the low piles and high poles; add 5 pieces of bamboo set vertically, then 5 smaller pieces put horizontally. These pieces of bamboo are arranged and tied together to form a roof frame, based on this roof frame to make palm leaves. Palm leaves were taken from the wilderness in previous “videos“, palm leaves were taken to wither for toughness then split into two equal parts at. Method: if weaving from left to right, the center of the leaf is placed on the right, the left is the outer edge of the leaf and is slightly torn with two fingers to wrap around the horizontal piece of bamboo, which is the task to hold the leaf piece palm does not fall The next palm leaf pieces are made similar to the first leaf piece, the distance between the leaf pieces is 10cm. If set from right to left, do the opposite. After finishing the roof will calculate to seal around. Use pieces of bamboo previously separated and tied with strips of bamboo to create a wall frame. For convenience, I chose the remaining palm leaves to scratch and brace neatly with bamboo pieces. To keep it simple for the door, I just hang a palm leaf, when in or out just put aside.
Above is how “primitive skills” build WC. If you feel good or have any comments, please leave in the comment section below.
Thank you for reading the article on “primitivekills.net”
See you in the next posts!


Social